Explore the art of woodworking with expert tips, tutorials, and inspiration. Discover woodworking projects, techniques, and tools for DIY enthusiasts and woodworking hobbyists.

How to Make Wooden Toys That Encourage Hands-On Learning

How to Make Wooden Toys That Encourage Hands-On Learning

Craft Your Child's Imagination: Creating Educational Wooden Toys

In a world saturated with screens and digital entertainment, it's refreshing to return to the simple joy of hands-on learning. Wooden toys, with their natural warmth and tactile appeal, offer a unique opportunity to engage children's imaginations and nurture their development. Beyond mere amusement, these handcrafted treasures can become powerful tools for fostering crucial skills like problem-solving, creativity, and fine motor coordination.

Unleash the Power of Wooden Toys

Wooden toys go beyond the ordinary. They provide a tactile and sensory experience that digital devices simply cannot replicate. The smooth texture of wood, the satisfying sound of pieces clicking together, and the weight of the object in a child's hand all contribute to a more immersive and engaging experience.

Benefits of Wooden Toys

The benefits of wooden toys extend far beyond entertainment. Here's why they're a valuable addition to any child's playtime:

  • Cognitive Development: Wooden toys encourage problem-solving, critical thinking, and spatial reasoning. Simple puzzles, building blocks, and sorting games help children develop these essential skills.
  • Fine Motor Skills: The act of manipulating wooden pieces strengthens hand-eye coordination, dexterity, and fine motor skills. This is especially important for children who are developing their writing and drawing abilities.
  • Creativity and Imagination: Wooden toys act as blank canvases for children's imaginations. They can be transformed into anything from spaceships to castles, encouraging creativity and the ability to think outside the box.
  • Durability: Wooden toys are known for their durability, making them a long-lasting investment that can be enjoyed for generations. They are less prone to breaking than plastic toys, and their natural beauty only enhances with age.
  • Sustainability: Choosing wood as a material for your child's toys promotes environmental consciousness. Wood is a renewable resource that can be harvested sustainably, making it a more eco-friendly choice than plastic.

DIY Wooden Toy Projects: A Journey of Creativity

Crafting your own wooden toys is not just about creating a tangible object; it's about sharing a unique and personal experience with your child. It's an opportunity to bond, teach, and learn together. This DIY journey allows you to customize designs, choose safe and eco-friendly materials, and create toys that truly resonate with your child's interests.

Simple and Engaging Projects for Beginners

For those new to woodworking, there are plenty of easy and rewarding projects to get you started:

  • Wooden Puzzles: Start with a simple design, like a shape puzzle with interlocking pieces. Use a jigsaw or a scroll saw to cut out the shapes from a piece of plywood or hardwood. Sand the edges smooth and paint the pieces with bright, child-friendly colors.
  • Building Blocks: Simple wooden blocks are a timeless toy that never goes out of style. Cut wooden dowels or square blocks to different sizes and shapes. Sand them down and let your child paint them with their favorite colors.
  • Wooden Train: Using a simple design, you can create a wooden train with wheels, a carriage, and even a little engine. Cut the pieces from plywood, use dowels for axles, and sand everything smooth. You can add details with paint or felt.

Advanced Projects for Experienced Crafters

For those with more woodworking experience, there are more intricate projects to explore:

  • Wooden Dollhouse: Create a miniature world for your child's dolls with a wooden dollhouse. Use wood glue and clamps to assemble the walls, roof, and floors. You can add windows, doors, and furniture using simple hand tools.
  • Wooden Carpentry Tools: Encourage your child's interest in carpentry by making them a set of wooden tools. Use wood scraps to create miniature hammers, saws, screwdrivers, and other tools.
  • Wooden Play Kitchen: Build a functional play kitchen with a sink, stovetop, oven, and cabinets. This project requires more advanced woodworking skills, but it's a rewarding way to create a unique and imaginative toy.

Safety First: Tips for Working with Wood

Safety is paramount when working with wood, especially when crafting toys for children. Here are some essential tips:

  • Choose Safe Materials: Opt for untreated, non-toxic wood that is free from chemicals and finishes. Avoid using plywood with formaldehyde.
  • Sand Smoothly: Sand all edges and surfaces of your wooden toys thoroughly to remove any sharp splinters or rough areas that could harm children.
  • Use Child-Safe Finishes: If you choose to paint or varnish your toys, use non-toxic, lead-free paints and finishes specifically designed for children's toys.
  • Supervise Children: Always supervise children when they are playing with wooden toys, especially those with small parts that could be choking hazards.

Creating Lasting Memories Through Play

Crafting wooden toys is more than just a hobby. It's an opportunity to connect with your children on a deeper level. The shared experience of creating something together fosters a sense of pride and accomplishment. You're not just building a toy; you're building memories that will last a lifetime. As your children grow, these handcrafted treasures will become heirlooms, reminders of the love and care that went into their creation. So, pick up your tools, embrace your creativity, and embark on a journey of crafting wooden toys that will inspire and enrich your child's world.

Share:

How to Build Wooden Chess Tables with Stylish and Functional Features

How to Build Wooden Chess Tables with Stylish and Functional Features

Building a Stylish and Functional Wooden Chess Table

A wooden chess table is a timeless addition to any home, providing a dedicated space for strategic battles and intellectual challenges. Whether you’re a seasoned player or a budding enthusiast, crafting your own chess table allows you to personalize the experience and create a piece that reflects your unique style. This guide will walk you through the process, from planning to finishing touches, empowering you to build a chess table that's both stylish and functional.

Planning Your Chess Table

Before you pick up your tools, it's essential to plan your project. This involves considering the following:

Size and Dimensions

Determine the ideal size for your table based on your playing space and the number of people who will be using it. Standard chessboards are 19 inches square, but you can adjust the table's dimensions accordingly. For a more comfortable experience, consider adding extra space around the board for pieces and movement.

Design and Style

Decide on the overall style and design. Do you prefer a classic, elegant look, or something more modern and minimalist? You can explore different wood types, finishes, and decorative elements to achieve your desired aesthetic. Consider incorporating features like drawers for storing chess sets and other game accessories.

Materials

Choose the right materials for your chess table. Solid wood is preferred for its durability and beauty, with options including oak, cherry, maple, and walnut. Opt for plywood for a more affordable choice, but ensure it is thick enough to support the weight of the table and the board.

Tools and Equipment

Gather the necessary tools and equipment. This includes:

  • A circular saw or table saw
  • A jigsaw for cutting curves and intricate shapes
  • A drill with various bits
  • Sandpaper in different grits
  • Clamps to secure pieces during assembly
  • Wood glue
  • Screws and nails
  • Finishing supplies like stain, paint, or varnish
  • Building the Chess Table Base

    The base is the foundation of your chess table. You can opt for a simple four-legged design or explore more elaborate styles like a pedestal or trestle base. Ensure the base is sturdy and provides adequate support for the table top.

    Cutting and Assembling the Legs

    Cut the leg pieces to the desired length, ensuring they are all the same size. If using a more elaborate base, follow the detailed plans for cutting and joining the individual pieces. Use wood glue and screws or nails to secure the legs to the base frame. Once the base is assembled, reinforce it with crossbars or bracing for added stability.

    Attaching the Base to the Table Top

    Before attaching the base, ensure the table top is fully prepared and sanded smooth. Mark the center of the table top and align it with the center of the base. Attach the base using screws or bolts, making sure they are long enough to secure the base firmly to the tabletop.

    Creating the Table Top

    The table top is the star of your chess table. It houses the chessboard and should be meticulously crafted for both functionality and visual appeal.

    Cutting and Joining the Table Top Panels

    Cut the table top panels to the desired dimensions. For a larger table top, you may need to join multiple panels. Use wood glue and clamps to join the panels, and ensure the surface is flat and level before securing it with screws.

    Adding the Chessboard

    Consider the options for adding a chessboard to your table top. You can:

  • Create a recessed area for the board.
  • Attach the board to the table top surface using hinges or a sliding mechanism.
  • Use a removable board that rests on the table top.

    Finishing Touches

    Once the chess table is assembled, it’s time to add the finishing touches that will make it truly special. Sand the entire surface of the table, ensuring a smooth and even finish. Apply stain or paint, paying attention to the wood grain and the desired aesthetic. Consider adding a protective layer of varnish or polyurethane to protect the wood and enhance its beauty. You can also add decorative elements, such as inlays, carvings, or painted designs, to further personalize your chess table.

    Enjoy Your Chess Table

    After the finishing touches are complete, let your chess table dry completely. Then, position it in a well-lit and comfortable spot in your home, and start strategizing. With your custom-built chess table, every game will be a memorable experience.

  • Share:

    Beginner-Friendly Woodworking Projects: Download Free Plans Now

    Beginner-Friendly Woodworking Projects: Download Free Plans Now

    Beginner-Friendly Woodworking Projects: Download Free Plans Now!

    Hey there, wood-working newbie! Are you itching to get your hands dirty and create something beautiful and useful with wood? Well, you've come to the right place! Woodworking is a fantastic hobby that combines creativity, problem-solving, and the satisfaction of building something with your own two hands. But where do you even begin? Don't worry, we've got you covered with a list of beginner-friendly woodworking projects that are perfect for getting started.

    We’ll walk you through everything you need to know, from choosing the right tools to finding free plans that will have you crafting like a pro in no time. So grab your favorite beverage, settle in, and let’s dive into the wonderful world of woodworking!

    Why Woodworking is Awesome

    Here are just a few reasons why you should consider giving woodworking a try:

    • It's a Creative Outlet: Woodworking allows you to express your creativity and bring your ideas to life.
    • It's Practical: You can build useful and functional items for your home, garden, or even for gifts.
    • It's Relaxing: The process of woodworking can be incredibly therapeutic and relaxing, offering a break from the stresses of everyday life.
    • It's Rewarding: The feeling of accomplishment after finishing a project is incredibly satisfying.
    • It's a Great Way to Connect: There's a vibrant community of woodworkers, both online and offline, who are always willing to share their knowledge and support.

    Essential Tools for Beginners

    Before you jump into any project, you’ll need a few basic tools to get you started. Don’t worry, you don’t need to break the bank to start out. A few quality essentials will do you wonders!

    • Hand Saw: This is your go-to tool for making straight cuts in wood. Consider a crosscut saw for making cuts across the grain and a rip saw for cutting with the grain.
    • Measuring Tape: Essential for accurate cuts and precise measurements.
    • Pencil: Used for marking cuts on the wood.
    • Hammer: For driving nails and securing pieces together.
    • Screwdriver: A good set of screwdrivers in various sizes will come in handy for many projects.
    • Clamps: Used to hold pieces of wood together while gluing or securing them.
    • Safety Glasses: Protect your eyes from sawdust and flying debris.
    • Work Gloves: Protect your hands from splinters and sharp tools.
    • Wood Glue: For securely bonding pieces of wood together.

    You can find all of these tools at your local hardware store or online. As you gain experience, you can gradually expand your tool collection. There are also many great starter woodworking kits available that come with all the essential tools you’ll need to get going!

    Easy Woodworking Projects for Beginners

    Here are some beginner-friendly woodworking projects you can tackle right away:

    1. Cutting Board

    A cutting board is a practical and useful project for beginners. You can find free plans online for various shapes and sizes. Start with a simple rectangular or square design and upgrade to more intricate patterns as you gain confidence. It's a great opportunity to practice basic joinery techniques and learn how to finish wood with a food-safe sealant.

    2. Simple Shelf

    Building a shelf is another straightforward project that allows you to practice basic carpentry skills. You can use simple butt joints or learn how to create a more durable mortise and tenon joint for added strength. A shelf is perfect for storing books, plants, or displaying your favorite items. You can find free plans for shelves in various sizes and styles.

    3. Wooden Sign

    Making a wooden sign is a fun and creative project that can personalize your home or create a thoughtful gift. You can choose to paint or stain the sign, add lettering or decorative elements. You can learn about different woodburning techniques for adding designs and lettering. Find free sign plans online or come up with your own!

    4. Birdhouse

    Building a birdhouse is a delightful way to bring nature closer to your home. You can choose a classic design or find free plans for unique and charming birdhouses. You'll learn how to use a jigsaw to create intricate shapes and how to assemble pieces using simple joinery techniques.

    5. Picture Frame

    Creating your own picture frame is a fantastic way to showcase your favorite photographs or artwork. You can find free plans for different sizes and styles, including simple rectangular frames or more ornate designs. Learn to miter cuts for precise corners and how to use a router for creating a decorative border around the frame.

    Where to Find Free Woodworking Plans

    There are tons of resources online that offer free woodworking plans! Here are a few of our favorites:

    • Ana White: A treasure trove of free plans for furniture, home decor, and outdoor projects.
    • Woodworking for Mere Mortals: A website with a wide range of free plans for beginners and intermediate woodworkers.
    • Pinterest: A great resource for finding inspirational projects and free plans.
    • YouTube: Many woodworking channels offer free plans and tutorials.

    Important Safety Tips for Woodworking

    Woodworking can be a fun and rewarding hobby, but safety is paramount. Always take the following precautions to protect yourself from injury:

    • Wear safety glasses to protect your eyes from flying debris.
    • Use hearing protection when using loud tools.
    • Always use a dust mask to avoid inhaling sawdust.
    • Keep your work area clean and organized to prevent accidents.
    • Always use sharp tools to avoid putting extra pressure and risking injury.
    • Never work alone; if possible, have someone nearby in case of an emergency.

    Commonly Asked Questions

    1. What kind of wood should I use for my beginner projects?

    For your first few projects, choose a wood that is easy to work with and readily available at your local hardware store. Pine, fir, and poplar are good options as they are relatively soft and forgiving for beginners. As you gain experience, you can try working with harder woods like oak or cherry.

    2. How do I cut wood without splintering?

    To prevent splintering when cutting, use a sharp saw and make sure your cut line is well-defined. You can also apply masking tape to the wood along the cut line, which can help to minimize splintering.

    3. How do I finish a wood project?

    There are many ways to finish a wood project. For a simple finish, you can use a wood stain to enhance the natural beauty of the wood. You can also apply a clear sealant, like polyurethane or varnish, to protect the wood from moisture and scratches.

    4. How do I learn more about woodworking?

    There are many ways to learn more about woodworking! Take a class at a local community center or woodworking school. Read books and magazines about woodworking. Watch videos and tutorials online. And join a woodworking club or forum to connect with other woodworkers and share your passion.

    So there you have it! You're now armed with the information and inspiration to embark on your woodworking journey. Remember, practice makes perfect, so don't be afraid to try new things and experiment. And most importantly, have fun! Happy woodworking!

    Share:

    DIY Blanket Ladder Projects for Beginners to Sell

    DIY Blanket Ladder Projects for Beginners to Sell

    Cozy Up to Success: DIY Blanket Ladder Projects for Beginners to Sell

    Looking for a crafty project that’s both stylish and profitable? Look no further than the humble blanket ladder! This DIY project is easy to make, adaptable to any style, and always in demand. You can create a beautiful and functional piece that adds a touch of farmhouse charm to any room while selling it for a pretty penny. This guide will walk you through the basics of building blanket ladders, including the supplies you'll need, step-by-step instructions, and some unique design ideas to help you stand out in the market. So grab your tools, let's get started!

    Choose Your Style and Materials

    The first step in any DIY project is to envision your final product. Do you want a classic rustic ladder or a modern minimalist design? You'll also need to choose the right materials for your vision. Here's a breakdown of popular options:

    Wood Types

    • Reclaimed Wood: Adds a unique and rustic charm. Look for salvaged barn wood, pallet wood, or old beams for a vintage look.
    • Pine: A classic choice for woodworking projects, pine is affordable, easy to work with, and readily available.
    • Oak: Known for its strength and durability, oak adds a touch of elegance and sophistication. You can find it in various finishes to match your style.

    Ladder Styles

    • Traditional A-Frame: The most common and recognizable blanket ladder design, perfect for a farmhouse or rustic aesthetic.
    • Leaning Ladder: A more minimalist design, leaning against a wall for a modern look. This style often uses thinner materials for a lighter feel.
    • Wall-Mounted Ladder: Perfect for smaller spaces, this style is mounted directly to the wall, creating a decorative accent.

    Tools and Materials You'll Need

    Gather these tools and materials before you begin:

    • Wood: Choose the appropriate wood type and dimensions based on your ladder style.
    • Measuring Tape and Pencil: For accurate measurements and marking.
    • Circular Saw or Handsaw: To cut the wood to the desired size.
    • Drill and Drill Bits: For creating holes for screws and dowels.
    • Screwdriver or Screwdriver Bits: To secure the ladder pieces together.
    • Wood Glue: For a stronger bond between pieces.
    • Clamps: To hold the pieces together while the glue dries.
    • Sandpaper: To smooth out rough edges and create a polished look.
    • Wood Stain or Paint (optional): To finish the ladder and enhance its appearance.
    • Safety Glasses: To protect your eyes while working.

    Building the Ladder: Step-by-Step

    Now it's time to put your creative energy into practice! Follow these steps to construct your DIY blanket ladder:

    1. Cut the wood: Using your measuring tape and pencil, mark the wood according to your chosen design. Cut the pieces using a circular saw or handsaw, ensuring the cuts are precise and clean.
    2. Assemble the ladder: Glue and screw the pieces together, creating the rungs of the ladder. Ensure the rungs are spaced evenly and that the ladder is stable. Use clamps to secure the pieces while the glue dries.
    3. Sand and finish: Once the glue has dried, sand down the rough edges of the ladder to create a smooth, polished finish. Apply wood stain or paint if desired, letting it dry completely.
    4. Add finishing touches: You can personalize your ladder with decorative elements like rope accents, metal brackets, or decorative hooks. Let your creativity flow!

    Selling Your Blanket Ladders

    Now that you've created a stunning blanket ladder, it's time to share it with the world! Here are some tips for selling your DIY creations:

    • Target your audience: Consider your ideal customer and the style of ladder that would appeal to them. Are you selling to farmhouse enthusiasts, minimalist homeowners, or boho-chic lovers?
    • Price strategically: Factor in the cost of materials, your time, and the perceived value of your product when setting your price. Research similar ladders online to get an idea of market value.
    • Promote your product: Create eye-catching photos and write compelling descriptions for online marketplaces like Etsy or Facebook Marketplace. Consider showcasing your ladders at local craft fairs or markets.
    • Offer a unique selling proposition: Highlight what makes your blanket ladders special. Maybe you offer custom sizes, unique finishes, or eco-friendly materials.

    Let Your Creativity Take the Lead

    The beauty of DIY projects lies in the endless possibilities for customization. You can experiment with different wood types, finishes, and styles to create a truly unique product. Try adding rustic touches like rope accents, vintage hardware, or even upcycling old furniture into decorative elements.

    With a little effort and a creative spirit, you can turn your DIY passion into a profitable endeavor. The cozy charm of a blanket ladder will surely win over any customer and create a warm and welcoming atmosphere in any home. Happy crafting, and may your ladder business be a roaring success!

    Share:

    Cutting Boards with Custom Inlays: High-Profit Woodworking Projects

    Cutting Boards with Custom Inlays: High-Profit Woodworking Projects

    Cutting Boards with Custom Inlays: High-Profit Woodworking Projects

    Hey there, fellow woodworking enthusiasts! Are you looking for a woodworking project that's both beautiful and profitable? Look no further than custom cutting boards with inlays. These eye-catching pieces are in high demand, and they can command premium prices. Let's dive into the world of inlaid cutting boards and explore how you can turn this passion into a thriving woodworking business.

    Why Custom Inlaid Cutting Boards Are So Popular

    People love custom inlaid cutting boards for a few key reasons:

    • Unique and Personal: Each board is a one-of-a-kind creation, reflecting the woodworker's artistry and the customer's personal preferences.
    • Functional and Beautiful: Not only are they stunning to look at, but they also serve a practical purpose. People are drawn to the combination of beauty and functionality.
    • High Quality and Durability: The use of premium hardwoods and careful craftsmanship ensures the boards are built to last. This longevity makes them a worthwhile investment.
    • Gifting Potential: Custom inlaid cutting boards make exceptional gifts for housewarmings, weddings, or simply to show someone you care.

    Designing Your Inlay Cutting Board Masterpiece

    The design possibilities are endless with inlaid cutting boards. You can let your creativity run wild! Here's a breakdown of the design process to get you started:

    Choosing the Right Wood

    The wood you choose will have a huge impact on the overall look and feel of your board. Consider factors like:

    • Grain Pattern: Some woods have striking grain patterns, while others have a more subtle look. Play with different woods to achieve the desired aesthetic.
    • Color: The colors of your chosen woods will contribute to the overall visual appeal. Experiment with contrasting colors or use woods with similar tones for a more subtle effect.
    • Durability: Hardwoods are more resistant to scratches and wear, making them ideal for cutting boards. Consider woods like maple, cherry, walnut, or oak.
    • Budget: The cost of wood varies greatly. Keep your budget in mind as you make your selections.

    Designing the Inlay Pattern

    Here's where your creativity really shines! Get inspired by:

    • Nature: Think of intricate patterns found in flowers, leaves, or seashells.
    • Geometric Shapes: Squares, triangles, circles, and other geometric designs can be arranged to create eye-catching patterns.
    • Personal Interests: Incorporate elements that represent your hobbies or passions. For example, a music lover might include a guitar or musical notes in their design.
    • Customer Preferences: If you're creating custom boards for clients, listen to their ideas and tailor the design to their tastes.

    Selecting the Inlay Materials

    In addition to hardwoods, you can use other materials to add depth and visual interest to your cutting boards. Some popular options include:

    • Exotic Woods: Add a touch of luxury with exotic woods like ebony, rosewood, or purpleheart. The vibrant colors and unique grain patterns make them a statement piece.
    • Resin: Epoxy resin can be mixed with pigments to create a wide range of colors and effects. This can be used for bold, contrasting inlays or to create mesmerizing swirls and patterns.
    • Metal: Adding metal accents can enhance the durability and create a modern look. Consider using copper, brass, or stainless steel.
    • Other Materials: Get creative and experiment with other materials like bone, horn, or even fossilized wood.

    Mastering the Inlay Techniques

    Inlaying requires precision and patience, but with practice, you can achieve professional results. Here's a basic outline of the process:

    1. Preparing the Base: Ensure your base wood is smooth and free of any defects. Use a router to create a recess for the inlay.
    2. Cutting the Inlay Pieces: Cut the inlay pieces to the precise shape and size using a scroll saw or band saw.
    3. Fitting the Inlay: Carefully fit the inlay pieces into the recess, ensuring a snug fit.
    4. Securing the Inlay: Use epoxy resin or wood glue to secure the inlay pieces to the base. Apply the adhesive carefully to avoid any gaps or air bubbles.
    5. Finishing: Once the adhesive is dry, sand the board smooth and apply your desired finish. Oil finishes like mineral oil or food-grade cutting board oil are best for enhancing the natural beauty of the wood and protecting it from moisture.

    Marketing and Selling Your Custom Cutting Boards

    Once you've created your masterpiece, it's time to get it into the hands of admiring customers! Here are some effective marketing strategies:

    • Build an Online Presence: Create a website or online store to showcase your work and make it easy for potential customers to purchase. Use high-quality photos and engaging descriptions to capture attention.
    • Social Media Marketing: Engage your audience on platforms like Instagram, Facebook, or Pinterest. Post regular updates, share behind-the-scenes content, and highlight customer testimonials.
    • Craft Shows and Markets: Participate in local craft shows and markets to connect directly with potential customers and showcase your unique creations.
    • Collaborations: Partner with other artisans or businesses to expand your reach and offer unique, collaborative products.

    Pricing Your Cutting Boards

    When it comes to pricing, it's crucial to consider your costs and the value you're providing:

    • Materials: The cost of wood, inlays, and adhesives will vary depending on your choices.
    • Labor: Factor in the time spent designing, crafting, and finishing the board.
    • Overhead: Include costs like tools, equipment, and marketing expenses.
    • Market Value: Research comparable cutting boards in the market to understand the going rate for similar pieces.
    • Profit Margin: Don't forget to factor in a profit margin to ensure you're making a healthy income from your craft.

    Commonly Asked Questions

    What is the best wood for cutting boards?

    Hardwoods like maple, cherry, walnut, and oak are popular choices for cutting boards due to their durability and resistance to scratches. However, other woods like bamboo or acacia can also work well.

    How do I care for my cutting board?

    To keep your cutting board in top shape, hand wash it with warm soapy water and dry it thoroughly after use. Regularly oil the board with mineral oil or food-grade cutting board oil to protect it from moisture and cracking.

    How can I learn more about inlay techniques?

    There are numerous online resources, books, and woodworking classes that can teach you the ins and outs of inlay techniques. Explore YouTube channels, woodworking forums, and local woodworking guilds for guidance.

    With passion, creativity, and a bit of practice, you can create stunning, high-profit cutting boards with custom inlays that will impress both you and your customers. So, grab your tools, unleash your artistic side, and get ready to turn your love of woodworking into a rewarding business venture!

    Share:

    Simple Wooden Storage Bins with a Rustic or Modern Look

    Simple Wooden Storage Bins with a Rustic or Modern Look

    Simple Wooden Storage Bins: Rustic Charm Meets Modern Style

    Tired of clutter? Longing for a touch of rustic charm or sleek modern design in your home? Look no further than simple wooden storage bins! These versatile containers offer a practical solution for organizing your belongings while adding a touch of elegance to any space.

    Rustic Charm: Embrace the Beauty of Natural Wood

    For a touch of warmth and rustic charm, opt for wooden bins crafted from reclaimed or salvaged wood. These bins often bear the marks of time, with knots, grain patterns, and subtle imperfections that contribute to their unique character. Choose from a variety of wood types, including pine, oak, and cedar, each offering its own distinct aroma and aesthetic appeal. Paint these bins in earthy tones like brown, beige, or green to enhance their rustic feel. Alternatively, leave them unfinished for a natural and authentic look.

    Rustic Storage Bin Ideas:

    • Store blankets and throws in the living room for a cozy touch.
    • Organize toys and games in the playroom for a touch of rustic charm.
    • Create a rustic bathroom storage solution for towels, toiletries, and bath essentials.

    Modern Elegance: Sleek and Stylish Storage Solutions

    For a modern touch, consider wooden bins with clean lines and a minimalist aesthetic. Choose bins made from smooth, polished wood like walnut or maple. Opt for neutral colors like black, white, or gray to complement a modern interior. Look for bins with simple, functional handles or no handles at all for a streamlined appearance. These sleek containers can seamlessly blend into any modern décor.

    Modern Storage Bin Ideas:

    • Store books and magazines on a bookshelf for a minimalist look.
    • Organize office supplies and paperwork for a clean and organized workspace.
    • Create a modern kitchen storage solution for pantry items, snacks, and baking supplies.

    DIY Wooden Storage Bins: Unleash Your Creativity

    Feeling ambitious? Craft your own simple wooden storage bins! This rewarding project allows you to personalize your storage solutions to perfectly match your style. Use readily available wood planks, a saw, drill, and sandpaper. Get creative with paint, stain, or even decoupage for a unique touch. You can easily customize the size and shape of your bins to meet your specific needs.

    Whether you prefer the warmth of rustic charm or the sleekness of modern style, simple wooden storage bins offer a practical and aesthetically pleasing way to organize your belongings. These versatile containers bring a touch of elegance to any space while keeping your home clutter-free and organized.

    Share:

    Profitable DIY Serving Tray Ideas for Craft Markets

    Profitable DIY Serving Tray Ideas for Craft Markets

    DIY Serving Tray Ideas for Craft Markets: A Step-by-Step Guide to Profitable Creations

    Are you looking for a fun and profitable craft project to sell at local markets? Look no further than DIY serving trays! Serving trays are a versatile and stylish addition to any home, and they're surprisingly easy to make.

    Here's the beauty of this venture: You can create a wide range of unique designs using different materials, finishes, and embellishments. That means you're not limited by generic products, and you can cater to specific tastes and interests, making your offerings stand out from the crowd.

    This guide will take you through a step-by-step process for crafting beautiful and profitable serving trays, from choosing materials to adding finishing touches. We'll even explore different design ideas and pricing strategies for success at your next craft market. Ready to get creative and turn your passion into profit? Let's dive in!

    Choosing Your Serving Tray Foundation

    The foundation of your serving tray will determine its size, shape, and overall style. Here are some popular options to consider:

    Wooden Trays

    Wooden trays are a classic choice for serving trays. You can find them in various sizes, shapes, and finishes at craft stores, hardware stores, and even thrift shops.

  • Pros: Wooden trays are durable, easy to work with, and offer a natural, timeless look. They can be stained, painted, or left in their natural state.
  • Cons: Wooden trays can be more expensive than other options.
  • Metal Trays

    Metal trays add a touch of modern elegance and can be found in various materials like tin, copper, or aluminum.

  • Pros: Metal trays are lightweight, often come in unique shapes, and can be easily customized with paints, stencils, or vinyl decals.
  • Cons: Metal trays can be prone to scratches and may require careful cleaning.
  • Ceramic or Porcelain Trays

    Ceramic and porcelain trays are known for their durability and elegant appearance. They are a great option for serving food and drinks due to their non-porous nature, making them easy to clean.

  • Pros: Ceramic or porcelain trays offer a unique and sophisticated look. They come in various styles and designs, making them perfect for adding a decorative touch to your serving trays.
  • Cons: They can be more fragile than other options, and their price might be higher.
  • Upcycled Materials

    Don't underestimate the potential of upcycled materials for your serving trays! You can create unique and eco-friendly pieces using old picture frames, cutting boards, or even repurposed wood from pallets.

  • Pros: Upcycled materials are an eco-friendly and budget-friendly way to create unique serving trays. They offer a vintage charm and a story behind them.
  • Cons: Upcycled materials may require more preparation, such as sanding or cleaning, before you can begin customizing them.
  • Adding a Touch of Magic: Decorative Elements

    Once you have your tray foundation, it's time to unleash your creativity! You can add a personal touch to your serving trays using various decorative elements.

    Painting

    A simple coat of paint can transform a plain serving tray into a stylish statement piece. Choose a color that complements the overall design and use stencils, masking tape, or freehand techniques to add patterns and designs.

  • Pros: Painting is a quick and easy way to customize your serving trays. You can use acrylic paint, chalk paint, or even spray paint.
  • Cons: Painting may require some skill, and you might need to apply multiple coats for a smooth finish.
  • Decoupage

    Decoupage is an art form that involves attaching paper cutouts, such as tissue paper, maps, or vintage book pages, to a surface using glue and varnish. It can create a unique and personalized look for your serving trays.

  • Pros: Decoupage is a fun and versatile technique that allows you to create unique designs using a wide variety of materials.
  • Cons: Decoupage can be time-consuming, requiring careful application and multiple coats of varnish.
  • Stencils

    Stencils are a great way to add patterns and designs to your serving trays. You can find stencils in various sizes and designs at craft stores or online.

  • Pros: Stencils offer a simple and precise way to add patterns to your serving trays, even if you don't have artistic skills. You can use stencils with paint, chalk paint, or even decoupage.
  • Cons: Stencils can be fragile and may need to be replaced after a few uses.
  • Vinyl Decals

    Vinyl decals are pre-designed adhesive stickers that you can easily apply to your serving trays. You can find vinyl decals in various styles and designs online or at craft stores.

  • Pros: Vinyl decals are easy to apply and create a professional-looking finish. You can remove them without damaging the surface underneath.
  • Cons: Vinyl decals can be more expensive than other decorating options, and the selection might be limited.
  • Other Embellishments

    Think outside the box! Unleash your creativity and explore other embellishments that can elevate your serving tray designs. Here are some ideas:

  • Fabric: Add a touch of softness and texture by using fabric scraps or ribbons to embellish your tray edges or handles.
  • Beads and Jewelry: Incorporate beads, buttons, or even repurposed jewelry to add a unique touch to your tray designs. Glue them onto the tray or create intricate patterns with them.
  • Natural Elements: Use dried flowers, twigs, or seashells to create a natural and rustic vibe for your serving trays.
  • Metal Accents: Add a touch of glamour with metal accents, such as gold leaf, metal foil, or decorative metal hardware.
  • Finishing Touches: Adding Functionality and Flair

    To create serving trays that are not only beautiful but also practical, consider adding these finishing touches:

    Handles

    Handles can be made from wood, metal, or rope, and they can be attached to the sides or top of the tray. They make it easier to carry and transport the tray.

    Feet

    Feet can be added to the bottom of the tray to elevate it and protect surfaces. They come in various styles, including wooden feet, metal feet, or even rubber bumpers.

    Sealing and Finishing

    Once you've finished decorating your serving tray, you need to seal it to protect the design and create a durable finish. You can use a sealant, varnish, or wax depending on the materials you've used.

    Pricing Your Serving Trays

    Pricing your DIY serving trays is an important step to ensure you make a profit at craft markets. Consider the following factors when determining your prices:

  • Cost of Materials: Add up the cost of the tray base, decorative materials, embellishments, and finishing products.
  • Time Spent: Factor in the time it took you to create each tray. Assign a reasonable hourly rate for your labor.
  • Market Competition: Research the prices of similar serving trays at other craft markets or online.
  • Profit Margin: Aim for a profit margin of 20-30% on each serving tray. This will ensure you're making a reasonable profit and covering your costs.
  • Commonly Asked Questions

    Let's tackle some questions you might have about crafting and selling DIY serving trays at craft markets.

    How do I find a good source for wooden trays?

    Craft stores like Michaels, Hobby Lobby, and Joann Fabrics offer a decent selection. You can also find them at hardware stores or home improvement centers like Home Depot or Lowe's. Consider looking for local woodworking shops or online marketplaces like Etsy or Amazon for unique options.

    Do I need any special skills to create these serving trays?

    Not necessarily! The beauty of DIY serving trays is that you can adapt the designs to your skill level. Simple designs can be achieved with basic painting techniques or using pre-made stencils. If you want to explore more complex designs, you can always take a decoupage class or brush up on your painting skills.

    What are some tips for selling my serving trays at craft markets?

    Here are some tips for making your serving trays shine at craft markets:

  • Presentation is Key: Display your serving trays beautifully on a stand or table with a neutral backdrop to highlight their designs.
  • Showcase Versatility: Include a few trays in your display that are styled with props to demonstrate their versatility. For example, you could show one tray with a charcuterie board setup and another with a bouquet of flowers.
  • Engage with Customers: Be approachable and enthusiastic about your products. Encourage customers to touch and interact with your serving trays.
  • Offer Discounts: Consider offering a small discount for multiple purchases or for customers who mention a coupon code.
  • Ready to get started? Choose your foundation, let your creativity flow, and create stunning DIY serving trays that will impress customers and boost your profits at craft markets. Happy crafting!

    Share:

    Easy Woodworking Items That Make Great Gifts to Sell

    Easy Woodworking Items That Make Great Gifts to Sell

    Easy Woodworking Items That Make Great Gifts to Sell

    Woodworking is a rewarding hobby that can also be a lucrative side hustle. If you're looking for easy woodworking projects to make and sell, you've come to the right place! This article will explore some simple yet sought-after woodworking items that are perfect for gifting and generating income. From practical home decor to charming personalized pieces, these projects are sure to appeal to a wide range of buyers.

    Simple and Practical Woodworking Projects for Gifting

    The beauty of woodworking lies in its ability to create both functional and decorative items. When starting your woodworking journey, focus on projects that are easy to make, require minimal tools, and cater to everyday needs.

    Cutting Boards

    Cutting boards are essential kitchen tools that make excellent gifts. They are relatively simple to construct and can be personalized with various designs, engravings, or even custom shapes. Use a durable hardwood like maple, cherry, or walnut for a long-lasting cutting board. Consider adding a juice groove to prevent spills and enhance functionality.

    Coasters

    Coasters are another great woodworking project for beginners. These small but practical items are perfect for protecting furniture surfaces and adding a touch of style to any coffee table. You can experiment with different shapes, sizes, and wood types to create a diverse selection of coasters.

    Wooden Spoons

    Handmade wooden spoons are gaining popularity for their unique craftsmanship and natural beauty. They add a touch of rustic charm to kitchens and are appreciated by cooking enthusiasts. Start with simple spoon designs and gradually progress to more intricate shapes as you gain experience.

    Planters

    Wooden planters are a popular choice for home gardeners. They are a great way to display plants and add a touch of natural elegance to indoor or outdoor spaces. You can use various wood types and stain finishes to create planters that complement different styles and preferences.

    Personalized Woodworking Gifts for Special Occasions

    Personalized gifts hold sentimental value and make memorable presents. Woodworking offers a unique way to create custom-made gifts that reflect the recipient's interests, hobbies, or special moments.

    Engraved Wooden Signs

    Engraved wooden signs are versatile gifts that can be personalized with messages, names, dates, or quotes. They make thoughtful housewarming gifts, wedding presents, or even unique decorations for a nursery.

    Personalized Cutting Boards

    Take your cutting boards to the next level by adding a personal touch. You can engrave initials, special dates, or even a simple "Happy Birthday" message to create a truly unique gift.

    Photo Frames

    Handmade wooden photo frames are a timeless gift that allows people to showcase cherished memories. You can create simple frames with a clean design or explore more intricate designs with carvings or inlays.

    Tips for Selling Your Woodworking Creations

    Once you've crafted your woodworking masterpieces, it's time to market and sell them. Here are some tips to help you successfully sell your woodworking gifts:

    • High-Quality Materials: Use high-quality wood, finishes, and hardware to ensure your creations are durable and visually appealing.
    • Clean and Professional Presentation: Present your woodworking pieces in an attractive manner. Consider using natural packaging materials like burlap or kraft paper to enhance the rustic charm.
    • Online Marketplaces: Utilize platforms like Etsy, Facebook Marketplace, or specialized woodworking websites to showcase your work and reach a wider audience.
    • Local Craft Fairs: Participate in local craft fairs and markets to connect directly with potential customers and showcase your woodworking skills.
    • Social Media Presence: Create a social media presence to showcase your woodworking projects, share progress updates, and engage with potential buyers.
    Share:

    Build a Business with These Cutting Board Projects

    Build a Business with These Cutting Board Projects

    Crafting a Cutting Board Business: From Concept to Carving Success

    The kitchen is the heart of the home, and cutting boards are its essential workhorse. With a growing appreciation for high-quality, handcrafted items and a desire for personalized touches, the demand for unique cutting boards is on the rise. This presents an exciting opportunity for aspiring entrepreneurs to carve out a niche for themselves in the world of woodworking.

    This article delves into the ins and outs of starting a cutting board business, covering everything from choosing the right wood to marketing your creations.

    Choosing the Right Wood: The Heart of Your Cutting Board

    The heart of any cutting board business lies in the selection of its core ingredient: the wood. Each wood species boasts unique characteristics that impact its durability, aesthetics, and price point. Here's a glimpse into the world of cutting board woods:

    Hardwoods: For Durability and Beauty

    Hardwoods, known for their strength and resilience, are ideal for cutting boards that will see regular use. These are just a few top contenders:

    • Maple: Known for its hardness, durability, and beautiful grain patterns, maple is a popular choice. It's readily available and relatively affordable.
    • Walnut: With its rich, dark hues and stunning grain, walnut is a premium option. It's naturally resistant to bacteria and moisture, making it perfect for cutting boards.
    • Cherry: This wood offers warm tones and a distinctive grain that becomes richer with age. It's a bit softer than maple but still very durable.
    • Oak: Renowned for its strength and durability, oak is a classic choice. Its distinct grain adds character and rustic charm to cutting boards.

    Softwoods: For a Lighter Touch

    While not as durable as hardwoods, softwoods offer a more affordable option with a lighter aesthetic. They are often used for smaller cutting boards or decorative pieces.

    • Pine: Known for its affordability and attractive knot patterns, pine is a popular choice for beginners. However, it's softer and more prone to scratches.
    • Cedar: Renowned for its aromatic properties and natural insect repellent, cedar is a unique choice for cutting boards. Its color ranges from reddish-brown to golden yellow.

    Crafting Your Cutting Boards: From Concept to Carving

    Once you've chosen your wood, it's time to bring your cutting board vision to life. This involves several key steps:

    1. Sourcing Your Wood: Finding the Right Supplier

    Whether you're seeking planks, slabs, or reclaimed wood, finding a reliable supplier is crucial. Explore local lumberyards, online wood retailers, or even salvage yards for unique finds.

    2. Cutting and Shaping: Creating the Foundation

    This step involves cutting the wood to your desired dimensions and shaping it into the desired cutting board form. You'll need a table saw, band saw, or jigsaw, along with safety gear and a keen eye for detail.

    3. Joinery: Securing Your Board's Strength

    For larger cutting boards or those made from multiple pieces, joinery techniques such as tongue-and-groove, edge-grain, or finger joints are essential to create a strong, stable board.

    4. Finishing Touches: Protecting and Enhancing Your Creation

    Finishing your cutting board is a crucial step, adding protection and enhancing its appearance. Options include:

    • Mineral Oil: A natural, food-safe option that nourishes and protects wood. It's ideal for everyday cutting boards.
    • Beeswax: Provides a water-resistant, protective finish with a warm sheen.
    • Food-grade Epoxy: Suitable for cutting boards with edges or gaps, it creates a durable, seamless surface.
    • Polyurethane: Offers a tough, water-resistant finish but may not be suitable for food contact.

    Pricing Your Cutting Boards: Finding the Sweet Spot

    Setting the right price for your cutting boards is crucial for profitability. Consider the following factors:

    • Cost of Materials: Include the price of wood, finishing supplies, and any hardware used.
    • Labor Costs: Factor in the time it takes to craft each board, from cutting and shaping to finishing.
    • Overhead Costs: Account for expenses such as rent, utilities, insurance, and marketing.
    • Competitive Pricing: Research what other cutting board makers are charging and position your prices accordingly.
    • Profit Margin: Ensure you're making a profit on each sale to sustain your business.

    Marketing Your Cutting Boards: Reaching Your Target Audience

    Once your cutting boards are ready, it's time to get them into the hands of customers. Here are some marketing strategies to consider:

    1. Embrace the Power of Social Media

    Platforms like Instagram, Facebook, and Pinterest offer excellent avenues to showcase your cutting boards. Share high-quality photos, videos, and behind-the-scenes glimpses into your crafting process. Engaging stories and user-generated content can also boost your visibility.

    2. Create an Online Presence

    A website or online store allows customers to browse your creations, learn about your business, and make purchases. Consider using e-commerce platforms like Shopify or Etsy to simplify the selling process.

    3. Connect with Local Markets and Events

    Participating in craft fairs, farmers' markets, and local events provides a direct connection with potential customers. These events offer a chance to showcase your craftsmanship, answer questions, and build personal relationships.

    4. Partnerships and Collaborations

    Collaborate with local businesses such as restaurants, cafes, or gift shops to sell your cutting boards. Consider offering wholesale pricing or partnering with other artisans for cross-promotion.

    Essential Tips for Success

    As you embark on this woodworking journey, remember these essential tips:

    • Focus on Quality: Craft durable, aesthetically pleasing cutting boards that stand the test of time.
    • Offer Variety: Provide a range of sizes, shapes, and wood species to cater to different needs and preferences.
    • Build Relationships: Connect with customers, respond to inquiries promptly, and provide excellent customer service.
    • Stay Passionate: Keep your love for woodworking alive. Your enthusiasm will shine through in your creations and attract loyal customers.

    Starting a cutting board business is a rewarding journey that combines creativity, craftsmanship, and the joy of connecting with people through beautiful, functional objects. With dedication and the right strategies, you can carve out a successful business that will last for years to come.

    Share:

    Wooden Project Ideas for Garden Lovers: Build Functional Pieces for Outdoors

    Wooden Project Ideas for Garden Lovers: Build Functional Pieces for Outdoors

    Wooden Project Ideas for Garden Lovers: Build Functional Pieces for Outdoors

    For those who adore the peace and beauty of their gardens, woodworking projects offer a unique way to enhance the space and add personal touches. Building functional pieces not only adds aesthetic appeal but also serves practical purposes, making your outdoor haven even more enjoyable. Let's delve into some inspiring woodworking project ideas that cater to garden lovers.

    Wooden Garden Furniture

    Building your own garden furniture is a rewarding and satisfying experience. Whether you're seeking a cozy bench for relaxing evenings under the stars or a sturdy table for al fresco dining, a multitude of possibilities await.

    DIY Garden Bench

    Start with a simple yet elegant garden bench. Choose sturdy wood like cedar or redwood for longevity. Consider incorporating decorative elements such as curved armrests or slatted backs. A well-constructed bench will provide a comfortable resting spot and become a cherished focal point in your garden.

    Wooden Garden Table

    For outdoor dining or working on gardening projects, a wooden table is essential. You can build a basic rectangular table or explore more intricate designs with rounded corners or pedestal bases. Remember to select a weather-resistant finish for your table to ensure its durability.

    Rustic Garden Decor

    Beyond furniture, woodworking opens doors to crafting unique garden décor that adds character and charm to your space.

    Birdhouses and Feeders

    Attract feathered friends to your garden with custom-built birdhouses and feeders. These small projects are perfect for beginners, and you can experiment with different shapes, sizes, and styles. Use vibrant colors and decorative elements to make your birdhouses stand out.

    Wooden Planters

    Instead of buying generic planters, create your own using reclaimed wood or salvaged lumber. Build square, rectangular, or even circular planters to fit your needs and design aesthetic.

    Functional Garden Structures

    Woodworking can also be used to build practical structures that enhance your gardening experience.

    Trellises and Arbors

    Enhance your climbing plants with sturdy trellises and arbors. These structures provide support for vines and flowers, creating vertical interest and adding beauty to your garden. Trellises can be freestanding or attached to walls, while arbors create inviting walkways or seating areas.

    Raised Garden Beds

    Raised garden beds offer numerous benefits, including improved drainage, soil control, and easier access for planting and harvesting. Build a raised bed with pressure-treated lumber for durability and create a space that's both functional and visually appealing.

    Tips for Success

    Here are some tips to ensure your woodworking projects are successful and enjoyable:

    • Plan Ahead: Start with a detailed design and create a cut list to ensure you have the necessary materials and tools.
    • Choose Quality Wood: Opt for durable and weather-resistant wood like cedar, redwood, or pressure-treated lumber.
    • Use Proper Tools: Invest in the right tools for the job, including a saw, drill, sander, and clamps.
    • Protect Your Wood: Apply a weather-resistant finish like paint, stain, or sealant to protect your projects from the elements.
    • Don't Be Afraid to Experiment: Have fun with your woodworking projects and explore different techniques and designs.

    Woodworking is a rewarding hobby that allows you to create beautiful and functional pieces for your garden. With a little creativity and effort, you can transform your outdoor space into a haven of personalized charm and functionality.

    Share:

    Easy Floating Shelf Projects for Beginners

    Easy Floating Shelf Projects for Beginners

    Easy Floating Shelf Projects for Beginners

    Floating shelves offer a stylish and space-saving solution for displaying your belongings, adding personality to your home, and maximizing your storage potential. They create a modern and minimalist aesthetic, while seamlessly integrating into your existing décor. The best part? Even novice DIY enthusiasts can tackle these projects with ease!

    This comprehensive guide will equip you with the necessary knowledge and step-by-step instructions to confidently build your own floating shelves. We will delve into various designs, materials, and techniques, empowering you to craft unique and functional additions to your living spaces.

    Choosing the Right Materials

    The success of your floating shelf project hinges on selecting the appropriate materials. We'll explore the most popular choices, highlighting their advantages and drawbacks:

    Wood

    Wood reigns supreme as the go-to material for floating shelves due to its versatility, durability, and aesthetic appeal. Its natural grain patterns add warmth and character to any space. Popular wood choices include:

    • Pine: Affordable, lightweight, and readily available, pine is a beginner-friendly option. Its soft texture allows for easy cutting and shaping.
    • Oak: Known for its strength and durability, oak exudes a classic and timeless elegance. It is a heavier wood, requiring more precision during cutting and installation.
    • Maple: Renowned for its beautiful grain patterns and hardness, maple offers a striking visual impact. It is relatively expensive, but its longevity justifies the investment.
    • Birch: This wood boasts a smooth surface and a lighter color, creating a clean and contemporary look. It is a good choice for smaller, delicate shelf designs.

    Metal

    Metal shelves bring a sleek and industrial vibe to your décor. They are robust and can support heavier objects. Popular metal choices include:

    • Steel: Durable, rust-resistant, and easy to maintain, steel is a versatile option for a variety of design styles.
    • Aluminum: Lightweight, corrosion-resistant, and available in various finishes, aluminum offers a contemporary and modern aesthetic.
    • Brass: A luxurious option with a warm, golden tone, brass adds a touch of elegance and sophistication to your décor.

    Other Materials

    Beyond wood and metal, explore other materials like:

    • Glass: Glass shelves offer a minimalist and sleek aesthetic. They can be challenging to install due to their fragility, but their impact on any space is undeniable.
    • Acrylic: This lightweight and transparent material creates an illusion of floating objects. It's an excellent choice for minimalist designs and modern aesthetics.

    Simple Floating Shelf Designs for Beginners

    Ready to bring your floating shelf vision to life? Let's explore some easy-to-follow designs for beginners:

    Basic Rectangular Shelf

    This design is a classic for a reason. It's simple, versatile, and can be customized to fit any space. Here's what you'll need:

    • Wood board (length and width depending on your desired shelf size)
    • Two shelf brackets (sized appropriately for the wood board thickness)
    • Screws (matching the size and type of your brackets)
    • Level
    • Measuring tape
    • Pencil
    • Drill (optional, but recommended for easier installation)

    Steps:

    1. Measure and mark the desired location for your shelf on the wall.
    2. Use the level to ensure the marks are perfectly horizontal.
    3. Attach the shelf brackets to the wall using screws, making sure they are level and secure.
    4. Slide the shelf board onto the brackets, ensuring a snug fit.

    Corner Shelf

    Optimize your corner space with a corner shelf. This design adds a touch of functionality and flair to any room. Here's what you'll need:

    • Two pieces of wood (cut at a 45-degree angle to form a corner shape)
    • Four shelf brackets (two for each side of the corner)
    • Screws
    • Level
    • Measuring tape
    • Pencil
    • Drill (optional, but recommended for easier installation)

    Steps:

    1. Cut the wood boards at a 45-degree angle to create a corner shape.
    2. Measure and mark the desired location for the shelf in the corner of the wall.
    3. Use the level to ensure the marks are perfectly aligned with the corner.
    4. Attach the shelf brackets to the wall using screws, making sure they are level and secure.
    5. Fit the two wood boards together to create the corner shelf and place them on the brackets.

    Floating Shelf with a Hidden Support

    Add a touch of elegance and conceal the support structure with this design. Here's what you'll need:

    • Wood board (length and width depending on your desired shelf size)
    • Wood dowels (slightly shorter than the shelf depth)
    • Screws (matching the size and type of the dowels)
    • Wood glue
    • Level
    • Measuring tape
    • Pencil
    • Drill (optional, but recommended for easier installation)

    Steps:

    1. Mark the desired location for the shelf on the wall.
    2. Use the level to ensure the marks are perfectly horizontal.
    3. Drill pilot holes at the marked locations.
    4. Glue the wood dowels into the holes in the wall.
    5. Once the glue is dry, attach the shelf board to the dowels using screws.

    Tips for Success

    As you embark on your floating shelf journey, keep these helpful tips in mind:

    • Measure twice, cut once: Precision is key when working with wood. Measure carefully and double-check your measurements before making any cuts.
    • Use a level: Ensure your shelves are perfectly horizontal for a polished look.
    • Pre-drill holes: This prevents wood from splitting when you drive screws.
    • Sand down edges: Smooth any rough edges to prevent splinters and ensure a comfortable feel.
    • Finish your shelves: Protect your shelves from scratches and spills with a sealant or paint.
    • Plan your weight distribution: Consider the weight of the items you plan to display on the shelves when choosing materials and brackets.

    Conclusion

    Creating your own floating shelves is a rewarding and achievable DIY project. With the right materials, a dash of creativity, and these easy-to-follow instructions, you can transform your home with stylish and functional shelves that perfectly complement your personal style. Enjoy the process, and remember, even beginners can craft beautiful and practical solutions for their spaces.

    Share:

    DIY Wooden Shoe Racks for Home Organization Lovers

    DIY Wooden Shoe Racks for Home Organization Lovers

    DIY Wooden Shoe Racks for Home Organization Lovers

    In the realm of home organization, shoes often pose a significant challenge. From athletic sneakers to elegant heels, the sheer volume and variety of footwear can quickly clutter entryways, bedrooms, and closets. A well-designed shoe rack provides an elegant solution, transforming chaos into order. This article delves into the world of DIY wooden shoe racks, empowering home organization enthusiasts to create practical and stylish storage solutions that perfectly complement their personal style.

    The Allure of Wooden Shoe Racks

    Wood's natural beauty and versatility make it an ideal material for crafting shoe racks. Its warm tones and timeless appeal infuse a touch of elegance into any space. Wooden racks seamlessly blend with diverse décor styles, from rustic farmhouse to contemporary minimalist. Moreover, the durability of wood ensures that your shoe rack will stand the test of time, providing years of reliable service.

    Essential Tools and Materials

    Before embarking on your DIY shoe rack adventure, gather the necessary tools and materials. A well-equipped workshop or a dedicated work area will enhance your crafting experience.

    Tools

    • Measuring tape
    • Pencil
    • Saw (circular saw, jigsaw, or handsaw)
    • Drill
    • Screwdriver
    • Sandpaper
    • Clamps
    • Level
    • Safety goggles
    • Dust mask
    • Work gloves

    Materials

    • Wooden boards (pine, oak, or other desired wood species)
    • Wood screws
    • Wood glue
    • Wood stain or paint (optional)
    • Finish (polyurethane or wax)

    Simple and Stylish Shoe Rack Designs

    The world of DIY wooden shoe racks is teeming with creative possibilities. Let's explore a few simple yet stylish designs that can be easily adapted to suit your individual needs.

    Classic Shelf Design

    This timeless design involves creating a series of shelves that can be stacked vertically or horizontally. It's perfect for displaying shoes neatly and efficiently.

    1. Measure and Cut: Determine the desired dimensions of your shoe rack and cut the wooden boards accordingly. For each shelf, you will need two identical pieces.
    2. Assemble the Shelves: Join the two pieces of each shelf using wood glue and screws, ensuring the edges are aligned. Allow the glue to dry completely.
    3. Create the Uprights: Cut two long pieces of wood to serve as the uprights that will support the shelves. The height of the uprights will determine the overall height of the shoe rack.
    4. Attach the Shelves to the Uprights: Secure the shelves to the uprights using wood glue and screws, ensuring they are evenly spaced.
    5. Finishing Touches: Sand the entire shoe rack to smooth out any rough edges. Apply a wood stain or paint to enhance the aesthetic appeal, followed by a protective finish such as polyurethane or wax.

    Diagonal Shelf Design

    This design adds a touch of visual intrigue with angled shelves. It's ideal for showcasing a diverse collection of shoes.

    1. Measure and Cut: Determine the desired dimensions of the shoe rack and cut the wooden boards accordingly. For each shelf, you will need two pieces that are cut at a slight angle.
    2. Assemble the Shelves: Join the two angled pieces of each shelf using wood glue and screws, ensuring the edges are aligned. Allow the glue to dry completely.
    3. Create the Uprights: Cut two long pieces of wood to serve as the uprights that will support the shelves. The height of the uprights will determine the overall height of the shoe rack.
    4. Attach the Shelves to the Uprights: Secure the shelves to the uprights using wood glue and screws, ensuring they are evenly spaced and the angles match.
    5. Finishing Touches: Sand the entire shoe rack to smooth out any rough edges. Apply a wood stain or paint to enhance the aesthetic appeal, followed by a protective finish such as polyurethane or wax.

    Ladder Design

    This design emulates the look of a ladder, offering a vertical solution for maximizing space. It adds a touch of rustic charm to any room.

    1. Measure and Cut: Determine the desired height of the shoe rack and cut the wooden boards accordingly. You will need two long pieces for the sides of the ladder and multiple shorter pieces for the rungs.
    2. Assemble the Ladder Structure: Attach the shorter rung pieces to the long side pieces using wood glue and screws. Ensure the rungs are evenly spaced and secured for stability.
    3. Finishing Touches: Sand the entire shoe rack to smooth out any rough edges. Apply a wood stain or paint to enhance the aesthetic appeal, followed by a protective finish such as polyurethane or wax.

    Adding Personal Touches

    Once you have constructed the basic shoe rack, it's time to add personal touches to make it truly your own.

    • Decorative Hardware: Enhance the appearance with stylish drawer pulls, knobs, or hinges. Select hardware that complements your décor style.
    • Customizable Shelves: Add dividers or adjustable shelves to accommodate shoes of various sizes and styles.
    • Creative Staining or Painting: Experiment with different wood stains or paints to create a unique look. Consider distressed finishes, two-tone effects, or bold accent colors.
    • Personalized Labels: Add labels to each shelf, making it easy to identify different shoe types or family members' shoes.

    Safety Precautions

    Safety is paramount when working with wood and power tools. Always wear safety goggles, a dust mask, and work gloves to protect yourself from potential hazards.

    • Secure Work Area: Ensure your work area is well-lit and free from obstructions. Use clamps to secure the wood pieces while cutting or assembling.
    • Proper Tool Usage: Familiarize yourself with the proper operation of all tools before using them. Use sharp blades and drill bits for clean cuts and accurate drilling.
    • Avoid Overloading: Avoid overloading the shoe rack with excessive weight. Distribute the weight evenly to prevent tipping or collapse.

    Conclusion

    DIY wooden shoe racks offer a fantastic opportunity to unleash your creativity and enhance the organization of your home. With a little time, effort, and a dash of imagination, you can craft stylish and functional shoe storage solutions that are as unique as you are. Embrace the joy of DIY and transform shoe chaos into an organized and aesthetically pleasing haven.

    Share:

    Simple Wine Rack Ideas That Are Perfect for Craft Fairs

    Simple Wine Rack Ideas That Are Perfect for Craft Fairs

    Simple Wine Rack Ideas That Are Perfect for Craft Fairs

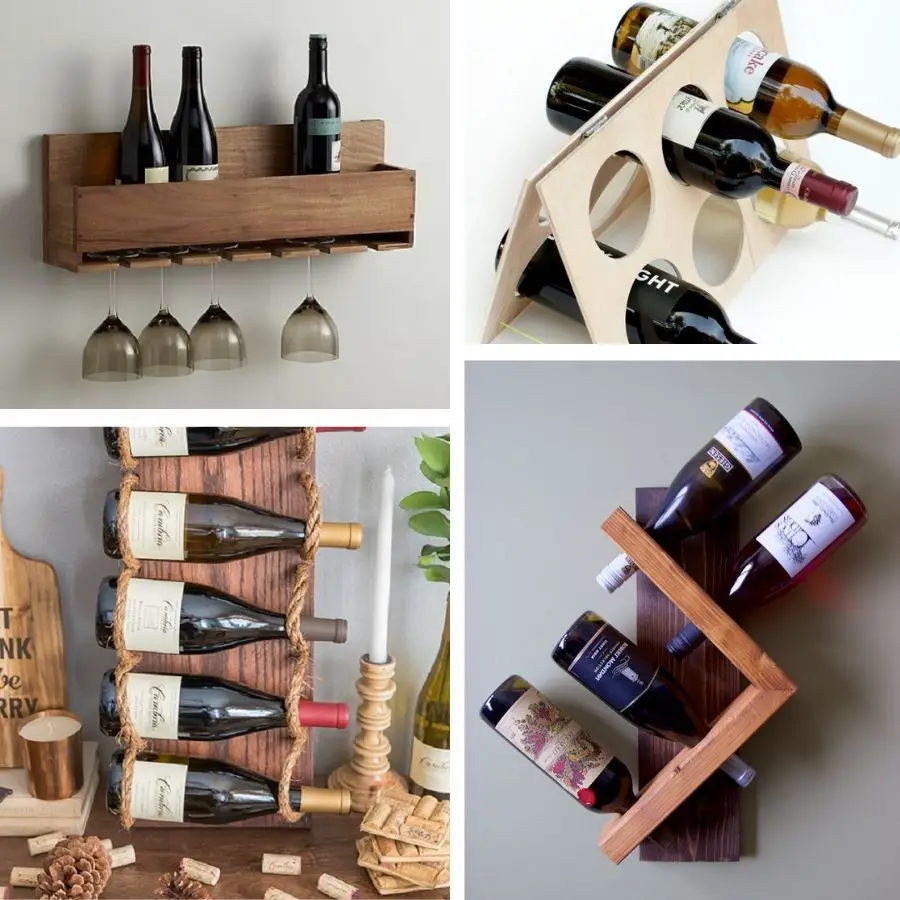
    Hey there, fellow craft fair enthusiasts! Looking for a simple and eye-catching project to sell at your next event? Look no further than wine racks. They're functional, stylish, and always in demand. Plus, they're super versatile, allowing you to get creative and showcase your unique style.

    I'm all about making things easy, so I've compiled a list of simple wine rack ideas that are perfect for craft fairs. No fancy tools or woodworking skills required! Let's dive in!

    Rustic Charm: Reclaimed Wood Wine Racks

    Reclaimed wood is all the rage these days, and for good reason! It adds a touch of rustic charm and sustainability to any project. And the best part? You can find reclaimed wood at salvage yards, thrift stores, or even repurpose old pallets!

    Simple Stacked Design

    For this design, you'll simply need to cut your reclaimed wood into planks of equal length. Then, stack them on top of each other with a slight gap between each plank to create a space for the bottles. Secure the stacks with wood glue and screws. You can leave the wood in its natural state or add a coat of stain or paint to create a different look.

    Rustic Wall-Mounted Rack

    For a more permanent solution, create a wall-mounted wine rack. Cut two longer pieces of reclaimed wood for the top and bottom rails and shorter pieces for the vertical supports. Attach the supports to the rails using wood glue and screws. Once assembled, attach the rack to the wall with sturdy brackets.

    Industrial Chic: Pipe Wine Racks

    Industrial style is super popular these days, and pipe wine racks are a great way to tap into that trend. They're strong, durable, and surprisingly easy to create.

    Basic Pipe & Flange Design

    For this simple design, you'll need pipe fittings, flanges, and pipe cutters. Cut the pipe to your desired length, attach the flanges to the ends, and voila! You have a basic wine rack. You can even customize the design by adding a wooden shelf or using different pipe sizes and shapes.

    Wall-Mounted Pipe Rack

    For a more substantial wall-mounted rack, use longer pipes and create a horizontal structure that can hold several bottles. Add a decorative touch with a metal shelf or a reclaimed wood plank.

    Modern Minimalism: Geometric Wine Racks

    Looking for something more modern and minimal? Try creating a geometric wine rack using simple materials like wood, metal, or even acrylic.

    Triangular Rack

    Cut three equal-length pieces of wood and form a triangle. Secure the corners using wood glue and screws. You can either leave the rack as a freestanding structure or mount it to the wall. Get creative with paint or stain to give it a unique look.

    Hexagonal Shelf

    Cut several hexagonal shapes out of wood, acrylic, or metal. Arrange them in a stack, creating a honeycomb pattern. You can even add a hidden support for the bottles to lean against. This modern and unique design will surely stand out at the craft fair!

    Beyond The Basics: Creative Wine Rack Ideas

    Feeling adventurous? Let's explore some out-of-the-box wine rack ideas that'll make your craft fair stall a hit!

    Repurposed Ladder Wine Rack

    Give an old ladder a new life by turning it into a stylish wine rack! You can use it as a freestanding rack or mount it to the wall. Add a decorative touch with a chalkboard paint for writing notes or labels.

    Wine Bottle Wall Art

    Create an eye-catching display by combining wine bottles with other materials like wood, metal, or even fabric. You can create a mosaic, an abstract design, or even spell out a word with the bottles! Be sure to secure the bottles securely to avoid any accidents.

    Personalized Wine Rack

    Add a personal touch to your wine racks by customizing them with names, initials, or even engraved messages. This makes your creations even more unique and special, which can be a great selling point at the craft fair.

    Tips for Success at the Craft Fair

    Now that you've got some amazing wine rack ideas, let's make sure you're ready to wow those craft fair attendees! Here are some tips to ensure a successful event:

    • Choose the right materials. Choose high-quality materials that are durable and look great. Don't be afraid to experiment with different materials to find your signature style.
    • Showcase your creations. Make sure your wine racks are displayed prominently and attractively. Use good lighting and consider adding props or decorations to create a visually appealing booth.
    • Price your racks competitively. Research the market to determine what other craft fair vendors are charging for similar items. Remember to factor in the cost of materials, time, and your profit margin.
    • Promote your business. Create flyers or business cards with your contact information and social media links. Be friendly and enthusiastic when interacting with potential customers, and answer any questions they may have.
    • Get feedback. Ask customers for their feedback on your products. It's a great way to learn about their preferences and improve your designs for future craft fairs.

    Remember, crafting wine racks is a great way to express your creativity and make some extra cash! With a little effort and imagination, you can create unique and beautiful pieces that will appeal to wine lovers and craft enthusiasts alike. Good luck at your next craft fair!

    Share:

    DIY Christmas Woodworking Gifts for Everyone on Your List

    DIY Christmas Woodworking Gifts for Everyone on Your List

    DIY Christmas Woodworking Gifts for Everyone on Your List

    Hey there, woodworkers! The holidays are right around the corner, and that means it’s time to get crafty and create some unique, personalized gifts for your loved ones. What better way to show someone you care than with a handmade gift from the heart? This year, why not tap into your woodworking skills and create some truly special presents? We're talking about gifts that are practical, beautiful, and guaranteed to be treasured for years to come.

    Gifts for the Homebody

    Let's start with the cozy folks on your list who love spending time at home.

    Rustic Wooden Serving Tray

    A serving tray is a super versatile gift that’s useful in any home. Think about the possibilities â€" serving drinks, snacks, breakfast in bed… the options are endless! You can make a basic rectangular tray or get creative with shapes and sizes. Just make sure to seal the wood with a food-safe finish.

    Custom Cutting Board

    Everyone needs a cutting board, and a handmade one is extra special. Use beautiful hardwoods like maple or cherry and personalize it with an engraved name or a festive design.

    Wooden Candle Holders

    Bring some warmth and ambiance to any room with custom candle holders. Make them simple and sleek or go for a more elaborate design with carvings or painted accents. Pair them with scented candles for an extra thoughtful touch.

    Gifts for the Foodie

    Got a foodie on your list? These gifts will make their kitchen a little more special.

    Wooden Utensil Holder

    A beautiful utensil holder is a great way to add some organization and style to the kitchen. Make it a simple box or get fancy with compartments for different utensils. Again, choose a food-safe finish for this one.

    Custom Wine Rack

    For the wine lover in your life, a handmade wine rack is a truly unique gift. You can build a simple wall-mounted rack or a larger freestanding one. Personalize it with their favorite wine label or a special inscription.

    Wooden Cheese Board with Knife Set

    Who doesn’t love a good cheese board? Combine a stylish wooden board with a matching cheese knife or two for a perfect gift set. Consider adding a small, engraved tag with their name or a cute message.

    Gifts for the Outdoorsy Type

    For those who love spending time in nature, these woodworking gifts are perfect.

    Wooden Birdhouse

    A birdhouse is a classic, timeless gift for anyone who enjoys watching nature. Build a simple design or go all out with intricate details and multiple compartments. Add a small plaque with their name or a cute inscription like “Welcome to the Birdhouse!”

    Personalized Firewood Rack

    For the campfire enthusiast, a custom firewood rack is a thoughtful gift. Make it with sturdy wood like cedar or redwood and add a personalized touch with their initials or a funny saying.

    Wooden Planter Box

    A wooden planter box is a great gift for gardeners or anyone who loves houseplants. Choose a size that works best for them and create a simple, stylish design. You can also add an extra touch with a decorative paint finish.

    Gifts for the Little Ones

    Don’t forget the kids! These gifts will bring joy to the little ones in your life.

    Wooden Toy Train

    A classic wooden toy train is a timeless gift that will be cherished for years to come. You can find plans for different types of trains, from simple to elaborate. Paint the train in bright colors and add details like wheels, tracks, and figures.

    Personalized Wooden Puzzle

    A custom puzzle is a great way to encourage creativity and problem-solving skills. Use a picture of a family member or pet, a favorite cartoon character, or a special place to make the puzzle extra special. You can also add their name or a personal message to the back of the puzzle.

    Wooden Play Kitchen Accessories

    If you’re feeling ambitious, create a set of wooden play kitchen accessories like pots, pans, utensils, and even a mini stove. Paint them with kid-friendly colors and make sure they’re sturdy enough for little hands.

    Tips for Success

    Now that you’re inspired to create some amazing woodworking gifts, here are a few tips to make the process a little smoother.

  • Plan Ahead. Start by choosing your projects and gathering the necessary supplies. This will save you time and stress later on.
  • Safety First. Make sure you’re using proper safety equipment like eye protection, dust masks, and gloves when working with wood.
  • Practice Makes Perfect. If you’re new to woodworking, start with a simple project to practice your skills. You can even use scrap wood to experiment with different techniques.
  • Don’t Be Afraid to Ask for Help. If you need assistance with a project, don’t be afraid to ask a more experienced woodworker for help. Many woodworking communities are friendly and supportive.
  • Add a Personal Touch. What makes a handmade gift truly special is the personal touch. Consider adding engraved names, special messages, or decorative touches to make your gifts stand out.
  • Remember, the most important part of gift-giving is the thoughtfulness behind it. These DIY woodworking gifts are a fantastic way to show your loved ones that you care, and they’ll be treasured for years to come.

    Share:

    How to Build Wall Shelves for Organizing and Displaying Plants

    How to Build Wall Shelves for Organizing and Displaying Plants

    Elevate Your Greenery: Building Wall Shelves for Plant Paradise

    Transform your home into a lush oasis with stunning, self-built wall shelves designed to showcase your beloved plants. Whether you have a small collection or a thriving jungle, these shelves offer a practical and visually appealing solution for organization and display. Let's dive into the rewarding process of building your own plant haven.

    Choosing the Right Materials

    Before you grab your tools, take a moment to select the materials that will complement your style and space.

    Wood Species:

  • Pine: Affordable and lightweight, pine is ideal for beginners. Its natural grain adds warmth to any room.
  • Oak: A durable and classic choice, oak provides a more robust look and stands the test of time.
  • Walnut: Known for its stunning dark grain and rich tones, walnut adds a touch of elegance and sophistication.
  • Bamboo: Sustainable and lightweight, bamboo brings a natural and airy feel to your shelves.
  • Hardware:

  • Brackets: Choose sturdy brackets that can support the weight of your shelves and plants. Metal brackets provide a modern touch, while wood brackets blend seamlessly with natural materials.
  • Screws: Opt for screws that are long enough to secure the shelves and brackets to the wall.
  • Level: Ensure your shelves are perfectly aligned with a level.
  • Designing Your Shelves

    Now comes the fun part: visualizing your shelves and choosing the perfect design.

    Shape and Size:

  • Rectangular: The classic and versatile rectangular shape is a timeless choice.
  • Rounded: Rounded shelves add a touch of softness and visual interest to your space.
  • Geometric: Experiment with geometric shapes like triangles or hexagons for a modern aesthetic.
  • Placement:

  • Staggered: Create a visually appealing display by staggering the shelves at different heights.
  • Symmetrical: For a more formal look, install shelves at equal distances from each other.
  • Step-by-Step Construction

    With your materials and design in place, it's time to turn your vision into reality.

    1. Measure and Cut:

    Use a measuring tape to determine the length and width of your shelves. Mark your cuts on the wood and carefully saw them to size.

    2. Sand and Finish:

    Sand the edges of your shelves to smooth out any rough spots. Apply a stain or paint to enhance the wood's natural beauty or create a custom look.

    3. Install Brackets:

    Use a stud finder to locate the wall studs for secure installation. Mark the bracket locations with a pencil and use a drill to create pilot holes. Secure the brackets to the wall with screws.

    4. Mount Shelves:

    Carefully slide your shelves onto the brackets, ensuring they are level. Attach the shelves to the brackets with screws from the underside.

    Finishing Touches

    Congratulations, you have created beautiful and functional wall shelves! Now, it's time to bring your plant paradise to life.

    1. Arrange and Admire:

    Choose a variety of plants that complement your shelves and create a balanced visual appeal. Play with heights, textures, and colors.

    2. Add Decor:

    Elevate your plant display with decorative elements. Consider adding a small sculpture, a woven basket, or a decorative pot.

    3. Enjoy Your Creation:

    Step back and admire your new plant haven. The satisfaction of building your own shelves, filled with vibrant greenery, is truly rewarding.

    Share:

    How to Make Floating Shelves That Fit Any Room Style

    How to Make Floating Shelves That Fit Any Room Style

    How to Make Floating Shelves That Fit Any Room Style

    Hey there, DIY enthusiasts! Are you looking for a way to add some style and storage to your home without taking up valuable floor space? Look no further than floating shelves! These versatile and stylish shelves can transform any room, whether it's a cozy living room, a sleek kitchen, or a chic bathroom.

    The best part? You don't need to be a seasoned woodworker to make your own floating shelves. With a few basic tools and materials, you can create custom shelves that perfectly complement your existing decor.

    Choosing Your Materials

    The first step in creating your floating shelves is selecting the right materials. This will depend on the style and functionality you're aiming for.

    Wood

    Wood is a classic choice for floating shelves, offering both durability and aesthetic appeal. You can choose from various wood types, each with its unique characteristics:

    • Pine: Affordable, lightweight, and easy to work with. Perfect for a rustic or farmhouse look.
    • Maple: Strong, durable, and known for its beautiful grain pattern. Great for modern or contemporary styles.
    • Walnut: Rich in color and elegant, with a distinctive grain. Suits traditional or mid-century modern styles.
    • Cherry: Offers a warm, reddish hue that ages gracefully. Suitable for traditional, rustic, or farmhouse styles.

    You can purchase wood planks pre-cut at your local lumberyard or hardware store, or you can cut them to your desired dimensions yourself. Just be sure to choose wood that is free of knots and blemishes for a cleaner, more polished look.

    Other Materials

    While wood is the most common material for floating shelves, don't be afraid to get creative! You can also use materials like:

    • Metal: Sleek and industrial, perfect for modern or contemporary spaces.
    • Glass: Elegant and minimalist, ideal for showcasing your belongings.
    • Acrylic: Lightweight and transparent, offering a modern, almost invisible look.
    • Reclaimed Wood: Adds a rustic charm and eco-friendly touch to your décor.

    Consider the overall style of your room and choose materials that complement your existing furniture and décor.

    Planning and Measuring

    Once you've chosen your materials, it's time to get to work on the planning and measuring phase. Here's how to get started:

    1. Determine the size of your shelves. Consider the space you have available and the items you plan to display. It's a good idea to sketch out your shelf design on paper.
    2. Measure your wall space. Use a measuring tape to get precise measurements of the area where you want to install your shelves.
    3. Decide on the shelf placement. Think about the height you want your shelves to be and the distance between them. Keep in mind the weight you'll be placing on the shelves and adjust your design accordingly.
    4. Mark the wall. Use a level and a pencil to mark the exact locations of your shelves on the wall.

    Remember to account for the thickness of the shelf material and the brackets when marking your wall to ensure proper alignment.

    Cutting and Finishing Your Shelves

    Now it's time to get your hands dirty and start cutting and finishing your shelves!

    1. Cut the shelves to size. Use a saw (a circular saw or miter saw works well) to cut your wood planks to the desired length. Measure carefully and make sure your cuts are straight and even.
    2. Sand the edges. Use sandpaper to smooth out any rough edges and to create a polished finish. Start with coarser grit sandpaper and gradually work your way to a finer grit.
    3. Finish the shelves. You can leave the shelves as is for a natural look, or you can add a stain or paint to enhance the color and protect the wood.
    4. Consider a sealant. A sealant helps protect your shelves from moisture and stains. Apply it with a brush or a rag, following the manufacturer's instructions.

    Remember to let your shelves dry completely before moving on to the next step.

    Installing the Floating Shelves

    The installation process is crucial to ensure your shelves are securely mounted and won't come crashing down. Here are the steps involved:

    1. Choose your mounting brackets. Select brackets that are strong enough to support the weight of your shelves and belongings.
    2. Mark the bracket placement. Use a level to mark the wall where you'll install your brackets. Be sure to consider the thickness of the shelves and the placement of any existing wall studs for optimal support.
    3. Drill pilot holes. Use a drill to create pilot holes where you'll be installing your brackets. This will help prevent splitting the wood and make installation easier.
    4. Install the brackets. Attach your brackets to the wall using appropriate screws or anchors, depending on the type of wall material. Make sure the brackets are securely fastened to the wall.
    5. Slide your shelves into place. Carefully slide your shelves onto the brackets, making sure they are level and secure.
    6. Enjoy your new shelves! Once you've installed your shelves, it's time to style them with your favorite books, plants, decorative items, or anything else that sparks joy.

    Creative Ideas for Styling Your Floating Shelves

    Now that you've created your beautiful floating shelves, it's time to show off your design skills. Here are some creative ideas to style your shelves:

    • Create a gallery wall: Arrange framed prints, artwork, and photographs to create a stunning focal point on your wall.
    • Showcase your favorite books: Display your book collection in an organized and visually appealing way.
    • Add some greenery: Introduce some life and color to your shelves with plants and flowers.
    • Use decorative containers: Store your essentials in stylish baskets, bowls, or trays to create a cohesive and organized look.
    • Play with different textures: Combine wood, metal, glass, and other materials to add dimension and visual interest to your shelves.
    • Highlight sentimental items: Display meaningful objects and souvenirs that remind you of special moments and travels.

    Remember, the key to styling floating shelves is to create a balance between functionality and aesthetics. Don't be afraid to experiment and have fun with your design!

    Tips for Creating Unique Floating Shelves

    Want to take your floating shelves to the next level? Here are a few tips to make them truly stand out:

    • Incorporate lighting: Add LED strips or small spotlights to highlight your shelves and their contents.
    • Use different shapes and sizes: Mix up your shelves with different widths, depths, and even angles to create a more dynamic look.
    • Get creative with the edges: Create rounded, beveled, or angled edges to add a touch of elegance to your shelves.
    • Add hidden storage: Create a secret compartment or a pull-out drawer behind your shelves to maximize storage space.

    With a little imagination and effort, you can create floating shelves that are as functional as they are beautiful.

    Happy DIYing!

    Share:

    Search This Blog

    Powered by Blogger.

    Blog Archive

    Blog Archive

    Recent Posts

    Sample Text


    Pages